안녕하세요.
로그인, 회원가입 등 모든 양식을 좀 더 안정적으로 받으려면 유효성 검사는 필수입니다.
준비
1.프로젝트 생성
ng g serve validation

cd validation

새로운 프로젝트를 생성하고
생성된 프로젝트로 디렉토리를 변경합니다
2.컴퍼넌트 생성
ng g c simple-form --module=app.module
ng g c complex-form --module=app.module
ng g c formvalidation --module=app.module

3개의 Component 생성

총 3가지를 진행 할 예정입니다.
3.App.Module 설정
import { BrowserModule } from '@angular/platform-browser';
import { NgModule } from '@angular/core';

import { AppRoutingModule } from './app-routing.module';
import { AppComponent } from './app.component';
import { SimpleFormComponent } from './simple-form/simple-form.component'; //추가
import { ComplexFormComponent } from './complex-form/complex-form.component'; //추가
import { FormvalidationComponent } from './formvalidation/formvalidation.component'; //추가

import { FormsModule, ReactiveFormsModule } from '@angular/forms'; //추가

@NgModule({
  declarations: [
    AppComponent,
    SimpleFormComponent, //추가
    ComplexFormComponent,  //추가
    FormvalidationComponent //추가
  ],
  imports: [
    BrowserModule,
    AppRoutingModule,


    ReactiveFormsModule, //추가
    FormsModule  //추가

  ],
  providers: [],
  bootstrap: [AppComponent]
})
export class AppModule { }


//해당 코드를 추가합니다.
//모듈에게 새로 만든 컴퍼넌트가 있다는 것을 알려주고
//FormsModule을 사용 할 것이므로 저것을 사용할 것이라는 것도 모듈에게 알려줍니다
4. bootstrap cdn 추가
<!doctype html>
<html lang="en">
<head>
  <meta charset="utf-8">
  <title>Validation</title>
  <base href="/">
  <meta name="viewport" content="width=device-width, initial-scale=1">
  <link rel="icon" type="image/x-icon" href="favicon.ico">
  <!--index.html --- 간단하게 사용할 것이므로 부트스트랩3를 cdn으로 추가-->
  <link href="https://maxcdn.bootstrapcdn.com/bootstrap/3.3.7/css/bootstrap.min.css" rel="stylesheet">
</head>
<body>
  <app-root></app-root>
</body>
</html>
- Simple Form
처음은 간단한 폼을 만들어서 입력을 받는 것을 진행할 것입니다.
1. TypeScript 작성
import { Component, OnInit } from '@angular/core';
@Component({
selector: 'app-simple-form',
templateUrl: './simple-form.component.html',
styleUrls: ['./simple-form.component.css']
})
export class SimpleFormComponent implements OnInit {
constructor() { }
ngOnInit() {
}
//입력받은 데이터를 colsol.log를 통해 확인
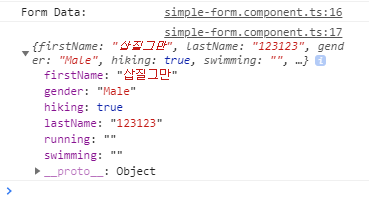
submitForm(form: any): void{
console.log('Form Data: ');
console.log(form);
}
}
2.HTML 작성
<p>simple-form works!</p>

<div class="jumbotron">
    <h2>Template Driven Form</h2>
    <!--from이라는 지역변수 선언하고 ngForm의 인스턴스로 설정-->
    <!--이렇게 함으로써 로컬 폼 변수는 FormGroup 유형이 되어 FormGroupAPI에 접근 가능-->
    <!-- form.value로 폼의 값을 보내는 ngSubmit 이벤트에서 사용함-->
    <form #form="ngForm" (ngSubmit)="submitForm(form.value)">
        <div class="form-group">
            <label>First Name:</label>
            <!--[(ngModel)]을 통해 양방향 바인딩을하고 속성을 할당-->
            <input type="text" class="form-control" placeholder="John" name="firstName" ngModel required>
        </div>
        <div class="form-group">
            <label>Last Name</label>
            <input type="text" class="form-control" placeholder="Doe" name="lastName" ngModel required>
        </div>
        <div class="form-group">
            <label>Gender</label>
        </div>
        <!-- 라디오 버튼과 체크는 거의 같은 방식으로 작동함-->
        <div class="radio">
            <label>
                <input type="radio" name="gender" value="Male" ngModel>
                Male
            </label>
        </div>
        <div class="radio">
            <label>
                <input type="radio" name="gender" value="Female" ngModel>
                Female
            </label>
        </div>
        <div class="form-group">
            <label>Activities</label>
        </div>
        <label class="checkbox-inline">
            <input type="checkbox" value="hiking" name="hiking" ngModel> Hiking
        </label>
        <label class="checkbox-inline">
            <input type="checkbox" value="swimming" name="swimming" ngModel> Swimming
        </label>
        <label class="checkbox-inline">
            <input type="checkbox" value="running" name="running" ngModel> Running
        </label>
        <div class="form-group">
            <button type="submit" class="btn btn-default">Submit</button>
        </div>
    </form>
</div>
3. 확인
- Comflex-Form
방금 진행 했던 심플보다 살짝 복잡하게 진행해보겠습니다.
1. TypeScript 작성
import { Component, OnInit } from '@angular/core';
import { FormBuilder, FormGroup } from '@angular/forms';
@Component({
selector: 'app-complex-form',
templateUrl: './complex-form.component.html',
styleUrls: ['./complex-form.component.css']
})
export class ComplexFormComponent implements OnInit {
//FormGroup객체는 양식을 처리하기 위한 다양한 API를 제공함
//여기서 새로운 객체를 생성하고 타입을 FormGroup으로 설정
complexForm : FormGroup;
//FormBuilder 인스턴스를 생성자에게 전달
constructor(fb: FormBuilder) {
//FormBuilder를 사용하여 양식을 작성
this.complexForm = fb.group({
//값을 전달하여 기본 값을 설정 할 수 있음
'firstName' : '',
'lastName': '',
'gender' : 'Female',
'hiking' : false,
'running' : false,
'swimming' : false
})
}
// consol로 값을 확인
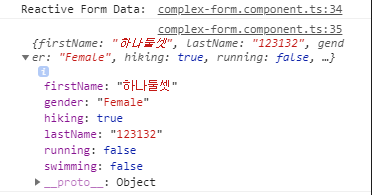
submitForm(value: any):void{
console.log('Reactive Form Data: ')
console.log(value);
}
ngOnInit() {
}
}
2. HTML 작성
<div class="jumbotron">
    <h2>Data Driven (Reactive) Form</h2>
    <!-- formGroup 지시문을 사용해서 생성자에서 정의한 Form객체를 설정 -->
    <!-- submitForm이 양식 전체를 볼 수 있는 것처럼 complexForm 루트 객체를 참조함 -->
    <form [formGroup]="complexForm" (ngSubmit)="submitForm(complexForm.value)">
      <div class="form-group">
        <label>First Name:</label>

        <!--ngModel을 설정하는 대신에 formControl 지시문을 사용하여 complexForm객체와 동기화-->
        <!--입력을 동기화하려는 속성도 가지고있음-->
        <input class="form-control" type="text" placeholder="John" [formControl]="complexForm.controls['firstName']">
      </div>
      <div class="form-group">
        <label>Last Name</label>
        <input class="form-control" type="text" placeholder="Doe" [formControl]="complexForm.controls['lastName']">
      </div>
      <div class="form-group">
        <label>Gender</label>
      </div>
      <div class="radio">
        <label>
          <input type="radio" name="gender" value="Male" [formControl]="complexForm.controls['gender']">
          Male
        </label>
      </div>
      <div class="radio">
        <label>
          <!--simple과 동일한 방식으로 작동-->
          <input type="radio" name="gender" value="Female" [formControl]="complexForm.controls['gender']">
          Female
        </label>
      </div>
      <div class="form-group">
        <label>Activities</label>
      </div>
      <label class="checkbox-inline">
        <input type="checkbox" value="hiking" name="hiking" [formControl]="complexForm.controls['hiking']"> Hiking
      </label>
      <label class="checkbox-inline">
        <input type="checkbox" value="swimming" name="swimming" [formControl]="complexForm.controls['swimming']"> Swimming
      </label>
      <label class="checkbox-inline">
        <input type="checkbox" value="running" name="running" [formControl]="complexForm.controls['running']"> Running
      </label>
      <div class="form-group">
        <button type="submit" class="btn btn-default">Submit</button>
      </div>
    </form>
  </div>
3. 확인
- Validation 유효성 검사
이번에는 유효성 검사까지 추가해 보겠습니다.
1. TypeScript 작성
import { Component, OnInit } from '@angular/core';
import { FormGroup, FormBuilder, Validators } from '@angular/forms';
@Component({
  selector: 'app-formvalidation',
  templateUrl: './formvalidation.component.html',
  styleUrls: ['./formvalidation.component.css']
})
export class FormvalidationComponent implements OnInit {
  complexForm : FormGroup;

  constructor(fb: FormBuilder) {

    this.complexForm = fb.group({
      //유용성 검사기를 추가하려면 문자열 값을 배열로 변환해야함.
      //배열의 첫항복이 기본 값인 경우 배열의 다음항목이 유효성 검사기임
      //여기서 first Name 속성에 값이 필수로 있어야 한다는 의미를 하는 필수 유효성 검사기
      'firstName' : [null, Validators.required],

      //필드 당 여러개의 유효성 섬사기를 추가 할 수 있음.
      //둘 이상 사용하려면 Validators.complose 함수로 맵핑해야함
      //여기에서는 필수,최소길이,최대길이를 사용함
      'lastName': [null, Validators.compose([Validators.required, Validators.minLength(5), Validators.maxLength(10)])],
      'gender' : [null, Validators.required],
      'hiking' : false,
      'running' :false,
      'swimming' :false
    })
   }
// consol로 값을 확인
submitForm(value: any):void{
  console.log('Reactive Form Data: ')
  console.log(value);
}

  ngOnInit() {
  }

}
2.HTMl 작성
<div class="jumbotron">
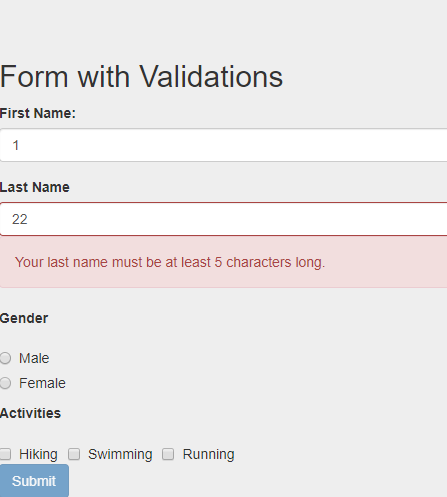
<h2>Form with Validations</h2>
<form [formGroup]="complexForm" (ngSubmit)="submitForm(complexForm.value)">
<div class="form-group" [ngClass]="{'has-error':!complexForm.controls['firstName'].valid && complexForm.controls['firstName'].touched}">
<label>First Name:</label>
<input class="form-control" type="text" placeholder="John" [formControl]="complexForm.controls['firstName']">
<!-- hasError 메소드는 특정 오류가 있는지 확인하고 있을시 알려줍니다 -->
<div *ngIf="complexForm.controls['firstName'].hasError('required') && complexForm.controls['firstName'].touched" class="alert alert-danger">You must include a first name.</div>
</div>
<div class="form-group" [ngClass]="{'has-error':!complexForm.controls['lastName'].valid && complexForm.controls['lastName'].touched}">
<label>Last Name</label>
<input class="form-control" type="text" placeholder="Doe" [formControl]="complexForm.controls['lastName']">
<!--hasError메소드는 내장 된 유효성 검사기 뿐아니라 사용자 지정 유효성 검사기에서도 동작합니다 -->
<div *ngIf="complexForm.controls['lastName'].hasError('required') && complexForm.controls['lastName'].touched" class="alert alert-danger">You must include a last name.</div>
<div *ngIf="complexForm.controls['lastName'].hasError('minlength') && complexForm.controls['lastName'].touched" class="alert alert-danger">Your last name must be at least 5 characters long.</div>
<div *ngIf="complexForm.controls['lastName'].hasError('maxlength') && complexForm.controls['lastName'].touched" class="alert alert-danger">Your last name cannot exceed 10 characters.</div>
</div>
<div class="form-group">
<label>Gender</label>
<div class="alert alert-danger" *ngIf="!complexForm.controls['gender'].valid && complexForm.controls['gender'].touched">You must select a gender.</div>
</div>
<div class="radio">
<label>
<input type="radio" name="gender" value="Male" [formControl]="complexForm.controls['gender']">
Male
</label>
</div>
<div class="radio">
<label>
<input type="radio" name="gender" value="Female" [formControl]="complexForm.controls['gender']">
Female
</label>
</div>
<div class="form-group">
<label>Activities</label>
</div>
<label class="checkbox-inline">
<input type="checkbox" value="hiking" name="hiking" [formControl]="complexForm.controls['hiking']"> Hiking
</label>
<label class="checkbox-inline">
<input type="checkbox" value="swimming" name="swimming" [formControl]="complexForm.controls['swimming']"> Swimming
</label>
<label class="checkbox-inline">
<input type="checkbox" value="running" name="running" [formControl]="complexForm.controls['running']"> Running
</label>
<div class="form-group">
<!-- 유효성 검사를 통과해서 submit 버튼이 활성화 됩니다 -->
<button type="submit" class="btn btn-primary" [disabled]="!complexForm.valid">Submit</button>
</div>
</form>
</div>
3. 확인
설명이 필요하다고 판단되는 부분은 주석으로 설명해 놓았습니다.
다소 많이 부족하지만 봐주셔서 감사합니다
'TypeScript > Angular' 카테고리의 다른 글
| Angular - Universal(SSR) (0) | 2020.05.23 |
|---|---|
| Angular - Visual Studio Code 디버깅 설정 (0) | 2020.05.23 |
| angular - interceptor 설정 (0) | 2020.05.20 |
| Angular -- build (0) | 2020.05.19 |
| Angular - Pipe (0) | 2020.05.19 |

